How to use the BIM Holoview application.
Below are instructions on getting your downloading, installing and general use of the BIM Holoview app.
If you need help with your Revit model click here.
If you need help with exporting from Navisworks click here.
For tips to make sure the Automatic Coloring works as expected please click here.
For tips to get the best results for printing QR codes please click here.
For HoloLens 2 please click here.
For Meta Quest please click here.
BIM Holoview
Instructions for installing the application:
Get the HoloLens application from the Microsoft Store .

Instructions for using the BIM viewer application in the HoloLens 1:
Downloading a model:
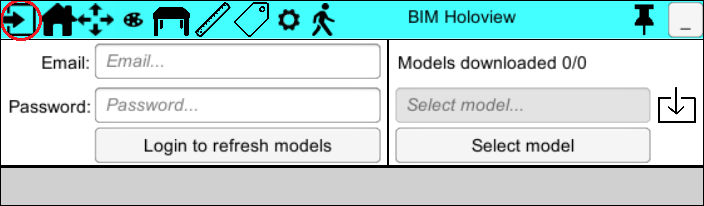
- Navigate to the Login page.
- Enter the same details you used to register on this website.
- Tap the Login button. Please wait until the hourglass stops spinning to continue.
- Once you have logged in the "Select model" button will become active.
- Tap the Select Model button.
- A list will appear populated with your processed models.
- Select the model from the list, navigating using the arrows. Tap OK once you have selected the model you wish to download.
- Tap the download button.

- A hour glass icon will appear in the top right corner and will stay there until the model is
downloaded. Once that model is downloaded it will be available on the Home page.
- You may experience some slight freezing here as the model gets processed.
Placing a model:
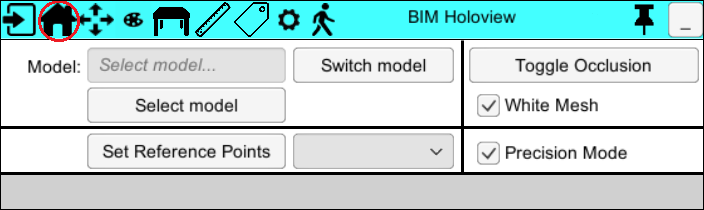
- Navigate to the Home page.
- The model should now appear in the Select Model list.
- Tap on the Select Model button.
- Select the model from the list, navigating using the arrows. Tap OK once you have selected the model you wish to place.
- Ensure the model you want is selected and the correct reference points are selected from the dropdown (A&B, C&D, E&F).
- Tap Set Reference Points.
- Tap on the place on the wall where you want each reference point to go (as previously chosen).
- Once again the hour glass icon will appear in the top right corner and will stay there until the model has been placed in the holographic space.
- You may experience some slight freezing here too as the model gets placed in the holographic space and the transparency options get applied.
- Tap on Toggle Occlusion to remove the spatial mesh walls as it blocks the full view of the model.
- Tap on White mesh to remove the white triangles from the spatial mesh but the walls will stay if the occlusion is on.
- If a model has a saved position then a button called Switch model will appear. You may tap this button
to reposition the model to previously set reference points.
- Toggling Precision Mode on will make the ruler and model placement more accurate. The accuracy can be adjusted on the settings page.
Moving a model:
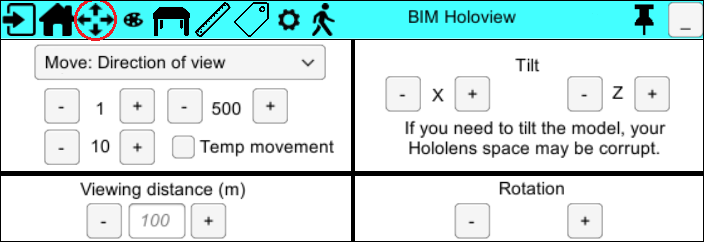
- Navigate to the Movement page.
- Select whether you would like to do a temporary movement.
- When the Temp movement checkbox is checked then it will save the current location so you
can move the model freely. Once you uncheck the checkbox it will move the model back to the originally saved position.
- When the Temp movement checkbox is not checked then all movement will be saved for the model.
- Tap on the + or - for each movement or rotation you wish to apply.
- For movement first select the direction you want to move the model from the dropdown.
- Changing the view distance allows you to see more of the model. It applies a viewing sphere around
the user and anything past the distance (in meters) is not visible.

Changing transparency or color options:
- Navigate to the Colors page.
- Tap Start Colors when you want to start applying colors.
- Turn on Hard Mode to interact with the model. Tapping a part of the model will change its color.
- Turn on Physical Surfaces to interact with real world physical surfaces.
- Turn on Hide on tap to hide parts of the model.
- Turn on Color on tap to cycle through colors when you tap parts of the model.
- Tap Stop Colors to stop applying colors.
- Tap Reset to reset all colors back to their original color.
- To change the transparency options, change the Model dropdown and ensure you have the desired Opacity level and tap Apply.
- The Opacity level changes the intensity of the transparency. An opacity level of 30 means it is 30% transparent.
Tabletop viewing:
- Navigate to the Tabletop page.
- The downloaded models will appear in the select model list.
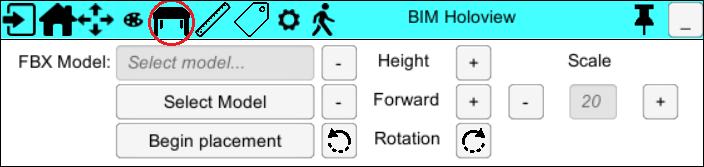
- Tap on the Select Model button.
- Select the model from the list, navigating using the arrows. Tap OK once you have selected the model you wish to place.
- Tap on the Begin placement button. A message will appear, read it and tap OK.
- The hourglass icon will appear as it processes the model ready for placement.
- Once the model is visible it will stay 1.5 meters in front of you until your next air tap. Tap once you are happy with the models placement.
- Tap on the + or - for each movement, rotation or scale you wish to apply.
Ruler:
- Navigate to the Ruler page.
- Tap Start Ruler to begin placing a ruler.
- Hard Mode allows you to place a ruler on the model.
- Physical Surfaces turns the real world walls off so you can place a ruler through the wall.
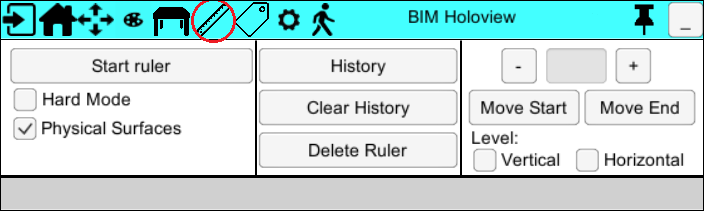
- Tap on the History button to show your ruler history.
- Tap on a previous ruler and tap OK to place the ruler again.
- Tap Clear History to delete all previously saved rulers.
- Tap Delete Ruler to delete a ruler.
- Select the desired ruler and tap OK to delete it.
- Tap back onto the Ruler page to exit the ruler deletion without deleting a ruler.
- Once a ruler is placed you can move the start and end positions by the right panel.
- First place a ruler or select one from the ruler history list.
- Modify the amount you are wanting the ruler to move by the + and - buttons.
- Tap Move Start or Move End to move the ruler. This will simply increase or decrease the length of the ruler.
- To level the ruler vertically or horizontally, toggle the Vertical or Horizontal level checkboxes prior to placing the ruler.
Properties page:
- Navigate to the Properties page.
- Ensure a model is placed and has properties. To get properties for your model please upload your model through our plugins which can be found on their respective instructions. Revit & Navisworks.
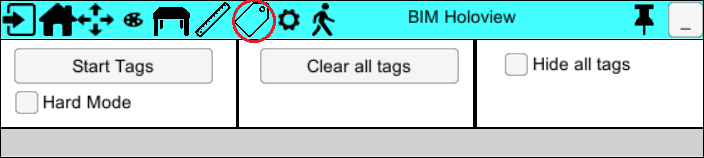
- Tap on the Start Tags button.
- Hard Mode needs to be enabled to start placing tags.
- Once you are in Tags mode you may tap on any object in your model and a new window will appear on that object.
- This will display all property information we gathered from our plugin.
- Tap on the movement icon to move the tag window. Tap on it again to place it.
- To remove the tag window just tap anywhere on the same object and it will be removed.
- Tap Stop Tags button to stop placing property tags.
- Tap Clear all tags to remove all current tags.
- Toggle Hide all tags to make the tag windows disappear and re-appear.
Changing default settings:
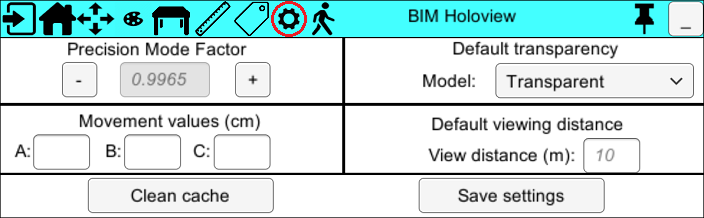
- Navigate to the Settings page.
- Change whatever values you wish to change.
- The precision factor directly affects the ruler so we recommend testing the accuracy of the ruler and modifying the precision factor accordingly.
- Tap the Save settings button.
- Tap the Clean cache button to delete all downloaded models.
Notes:
- Each model downloaded is saved into the cache. So the next time you open the app you won’t
have to download the model again, unless it is removed from the cache, which can happen when there is not enough room in the cache.
- You can clean/empty the cache by navigating to the Settings page and tapping on Clean Cache. This will wipe all currently downloaded models.
- You will stay logged into the app until another account is logged in.
- Once you get logged out the cache will be cleaned.
- The minimise button in the top right corner will make the UI disappear until you next tap.
- The pin button will pin the UI in place so it will stop following you.
- Each time you place a tabletop model it will be automatically optimized based on how close to the model you are.